Nginx-反向代理(三)
1. 前言
本文 主要通过案例
Nginx配置Ruoyi框架 ,学习反向代理。准备工作
2. 具体需求
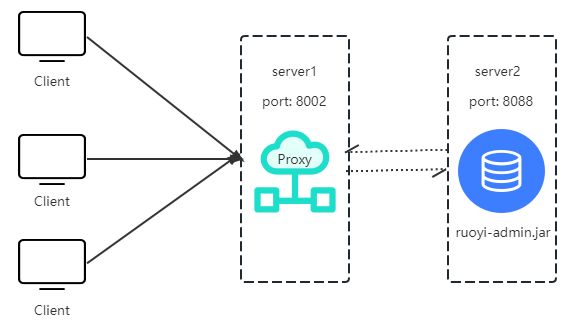
本过程也可以在一台服务器中进行,但为了更好的理解反向代理,本人用到的是两台服务器
server1和server2。
server1:部署的是nginx服务server2:部署的是后端 jar 服务实现流程如下:
- 首先,当客户端通过 http://ip:port/path 进行访问。
- 然后,当请求达到服务器之后,通过
Nginx代理 转发到真正的目标服务器上。- 最后,返回请求信息。
- 具体流程如下图
3. Nginx 配置 Ruoyi 框架
具体步骤如下:
server1:创建nginx配置文件,并使其生效。server2:修改ruoyi-admin.jar中的数据库连接信息,并使其生效。server1:通过crul命令是否可以访问该端口。- 客户端访问
3.1. 实现步骤
server1:创建nginx配置文件,并使其生效。nginx配置文件路径/etc/nginx/cond.d1
2
3
4
5
6
7
8
9
10
11
12
13
14
15# 虚拟主机server块
server{
# 监听端口
listen 8002;
# 匹配请求中的host值
server_name ruoyi.localhost;
# 监听请求静态资源路径
location / {
# 配置代理服务器, 这里 如果是本机就直接使用 http://localhost:port,如果不是就是用目标服务器的 ip + 端口。
proxy_pass http://server2:port;
}
}
刷新
nginx配置文件1
2
3
4
5[root@VM-0-9-centos conf.d]# /usr/sbin/nginx -t
nginx: the configuration file /etc/nginx/nginx.conf syntax is ok
nginx: configuration file /etc/nginx/nginx.conf test is successful
[root@VM-0-9-centos conf.d]# /usr/sbin/nginx -s reload
[root@VM-0-9-centos conf.d]#
server1:开放防火墙端口,刷新配置。如果为 阿里云 或者 腾讯云 需要配置安全组规则。例如:阿里云-配置安全组规则
1
2
3
4
5
[root@VM-0-9-centos images]# firewall-cmd --zone=public --add-port=8002/tcp --permanent # 开放8002端口
success
[root@VM-0-9-centos images]# firewall-cmd --reload # 刷新防火墙配置
success
[root@VM-0-9-centos images]#
server2:修改ruoyi-admin.jar中的数据库连接信息,并使其生效。通过压缩工具打开
jar包,可以通过360压缩或者7z打开
修改
BOOT-INF\classes文件下application-druid.yml文件中的 数据库连接信息关于Linux下的MySQL安装可以参考我的博客 《Linux-Shell-MySQL》
1
2
3
4
5
6
7
8
9
10
11
12# 数据源配置
spring:
datasource:
type: com.alibaba.druid.pool.DruidDataSource
driverClassName: com.mysql.cj.jdbc.Driver
druid:
# 主库数据源
master:
url: jdbc:mysql://server:3306/ry?useUnicode=true&characterEncoding=utf8&zeroDateTimeBehavior=convertToNull&useSSL=true&serverTimezone=GMT%2B8
username: root
password: P@ssw0rd
......
创建
ry数据库1
2# 创建 ruoyi 数据库 jdbc:mysql://server:3306/ry
CREATE DATABASE `ry` CHARACTER SET 'utf8mb4' COLLATE 'utf8mb4_unicode_ci';将百度网盘中的
ry_20210924.sql文件导入ry数据库中
上传至
/home/ruoyi盘符
启动项目
1
2
3-rw-r--r-- 1 root root 75366452 May 11 16:58 ruoyi-admin.jar
[root@VM-24-4-centos ruoyi]# nohup java -jar ruoyi-admin.jar &
[1] 26695查看日志
1
2
3
4
5
6
7
8
9
10
11
12
13[root@VM-24-4-centos ruoyi]# tail -f nohup.out
..............
17:09:07.497 [main] INFO c.r.RuoYiApplication - [logStarted,61] - Started RuoYiApplication in 22.314 seconds (JVM running for 23.97)
(♥◠‿◠)ノ゙ 若依启动成功 ლ(´ڡ`ლ)゙
.-------. ____ __
| _ _ \ \ \ / /
| ( ' ) | \ _. / '
|(_ o _) / _( )_ .'
| (_,_).' __ ___(_ o _)'
| |\ \ | || |(_,_)'
| | \ `' /| `-' /
| | \ / \ /
''-' `'-' `-..-'
如果为 阿里云 或者 腾讯云 需要配置安全组规则。例如:阿里云-配置安全组规则
1
2
3
4
5[root@VM-24-4-centos ruoyi]# firewall-cmd --zone=public --add-port=8088/tcp --permanent # 开放8088端口
success
[root@VM-24-4-centos ruoyi]# firewall-cmd --reload # 刷新防火墙配置
success
[root@VM-24-4-centos ruoyi]#
server1:通过crul命令是否可以访问该端口1
2[root@VM-0-9-centos conf.d]# curl http://server2:8088/
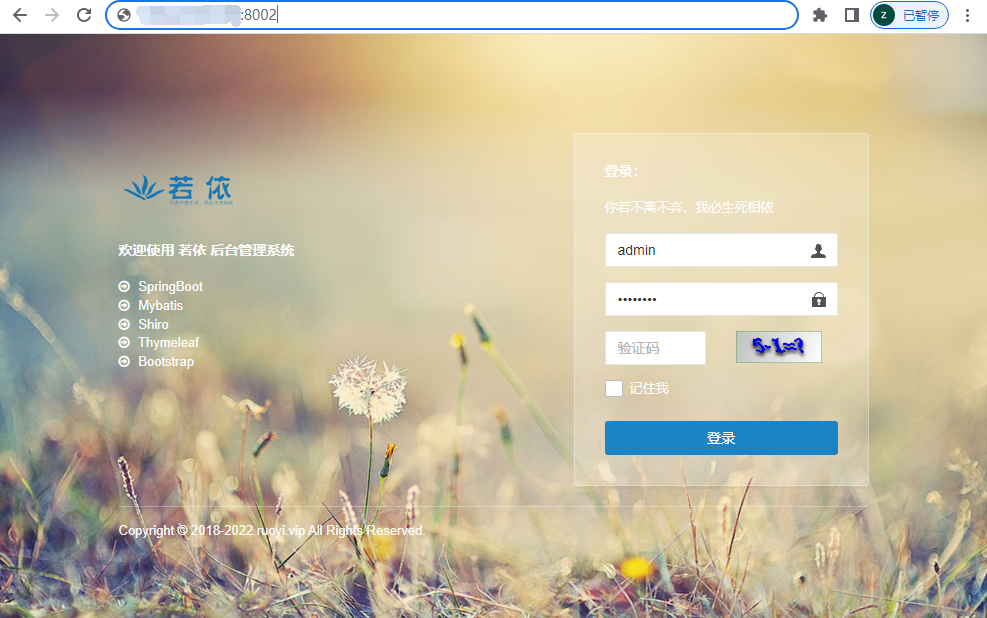
[root@VM-0-9-centos conf.d]#客户端进行访问
- 访问地址:http://server1:8002
4. 参考博文
本博客所有文章除特别声明外,均采用 CC BY-NC-SA 4.0 许可协议。转载请注明来自 Wickson Blog!
 wechat
 alipay


评论