1. 内容大纲
本章节的代码:https://github.com/wicksonZhang/data-structure/tree/main/1-ArrayList
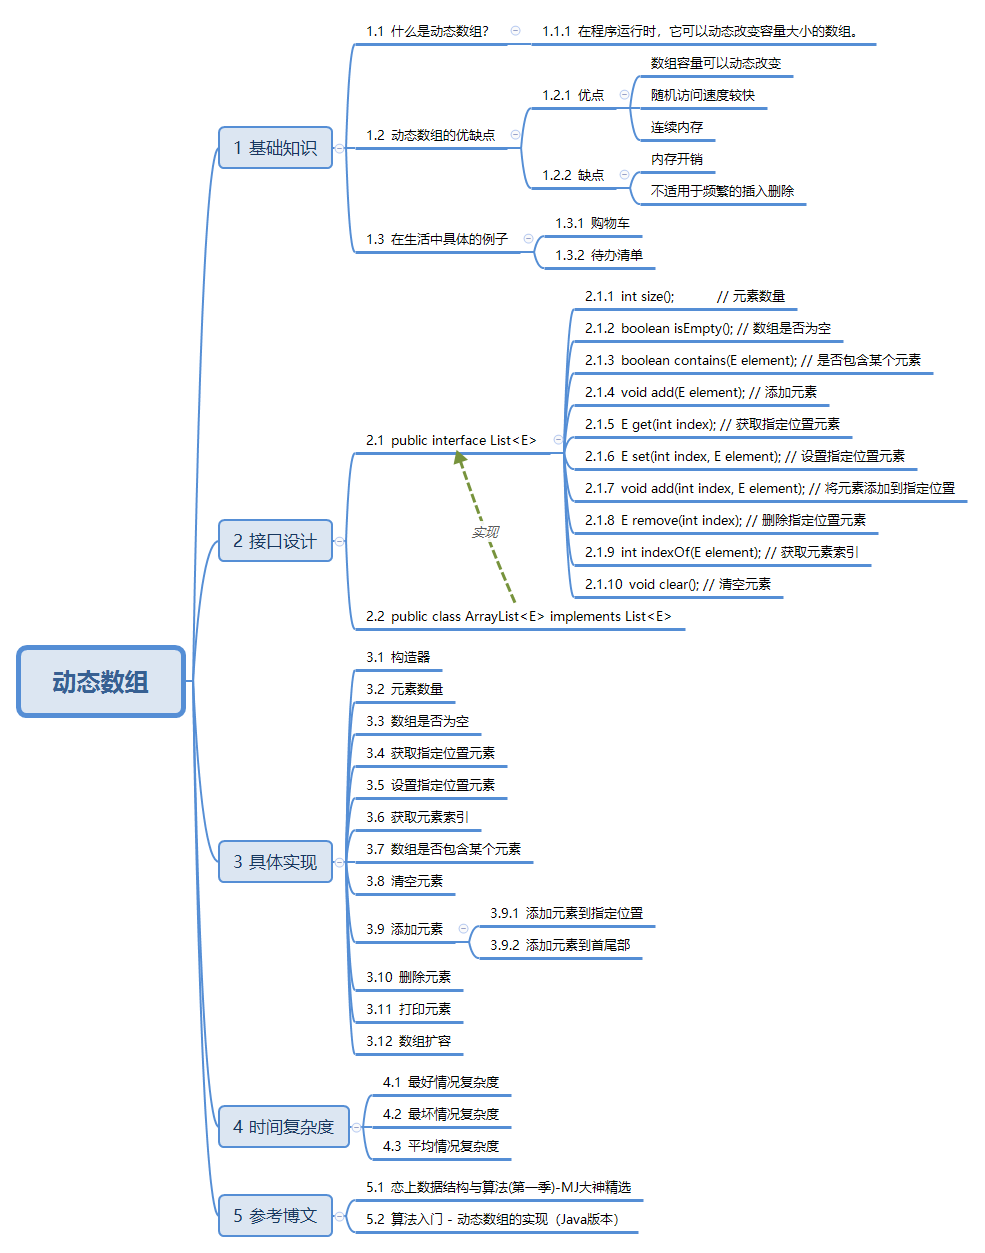
2. 基础知识
2.1. 什么是动态数组?
动态数组是一种数据结构,在程序运行过程中动态添加或删除数组的容量,使数组的容量可以动态的发生改变。
2.2. 动态数组优缺点
优点
- 容量动态改变:动态数组可以在需要时自动增加或减少容量,以适应数据的大小。
- 随机访问速度:由于数据在内存中是连续存储的,因此可以以常量时间访问任何元素,使其具有快速的随机访问速度。
- 连续内存:动态数组的元素在内存中是连续存储的,这可以提高缓存的命中率,提高性能。
缺点
- 不适合频繁的插入和删除
2.3. 应用场景
- 购物车:用于存储购物车中的商品列表,容量可以根据添加商品的数量动态调整。
- 待办清单:用于存储待办任务列表,随着添加或完成任务的变化,清单的大小可以动态变化。
3. 接口设计
我们主要是模仿 java 中的 java.util.ArrayList 集合进行设计
1
2
3
4
5
6
7
8
9
10
11
12
13
14
15
16
17
18
19
20
21
22
23
| public interface List<E> {
int size();
boolean isEmpty();
boolean contains(E element);
void add(E element);
E get(int index);
E set(int index, E element);
void add(int index, E element);
E remove(int index);
int indexOf(E element);
void clear();
}
|
1
2
3
4
5
6
|
public class ArrayList<E> implements List<E> {
}
|
4. 代码实现
4.1. 默认初始容量
主要包括成员变量、构造器
1
2
3
4
5
6
7
8
9
10
11
12
13
14
15
16
17
18
19
20
21
22
23
24
25
26
27
28
29
30
31
32
33
34
35
36
37
38
|
public class ArrayList<E> implements List<E> {
private int size;
private final E[] elements;
private static final int DEFAULT_CAPACITY = 10;
public ArrayList() {
this(DEFAULT_CAPACITY);
}
@SuppressWarnings("unchecked")
public ArrayList(int initialCapacity) {
if (initialCapacity < 0) {
throw new IllegalArgumentException("Illegal Capacity: " + initialCapacity);
} else if (initialCapacity == 0) {
elements = (E[]) new Object[]{};
} else {
elements = (E[]) new Object[initialCapacity];
}
}
}
|
4.2. 元素数量
这里元素的数量就是指的当前 size 大小
1
2
3
4
5
6
7
8
9
|
@Override
public int size() {
return size;
}
|
4.3. 数组是否为空
数组是否为空指的是当前 size 是否为 0
1
2
3
4
5
6
7
8
9
|
@Override
public boolean isEmpty() {
return size == 0;
}
|
4.4. 获取指定位置元素
注意:获取指定位置的元素时,需要保证 index 不能小于0 或者 大于 size
1
2
3
4
5
6
7
8
9
10
11
12
13
|
@Override
public E get(int index) {
if (index >= size || index < 0) {
throw new IndexOutOfBoundsException("Index: " + index + ", Size: " + size);
}
return elements[index];
}
|
4.5. 设置指定位置元素
注意:由于我们是需要返回原来指定位置的元素,所以需要将之前索引位置的元素取出来,然后在进行赋值。
1
2
3
4
5
6
7
8
9
10
11
12
13
14
15
16
|
@Override
public E set(int index, E element) {
if (index >= size || index < 0) {
throw new IndexOutOfBoundsException("Index: " + index + ", Size: " + size);
}
E oldElement = elements[index];
elements[index] = element;
return oldElement;
}
|
4.6. 获取元素索引
注意:需要对元素进行判断,当元素分别为 null 或者不为 null 的情况
1
2
3
4
5
6
7
8
9
10
11
12
13
14
15
16
17
18
19
20
21
22
23
|
@Override
public int indexOf(E e) {
if (e == null) {
for (int i = 0; i < size; i++) {
if (element[i] == null) {
return i;
}
}
} else {
for (int i = 0; i < size; i++) {
if (element[i].equals(e)) {
return i;
}
}
}
return -1;
}
|
4.7. 数组是否包含某个元素
判断数组是否包含某个元素是基于 indexOf(Element e) 进行开发的,如果找不到元素则返回 -1 ,所以我们只要判断结果大于0,就说明找到元素了。
1
2
3
4
5
6
7
8
9
10
|
@Override
public boolean contains(E e) {
return indexOf(e) >= 0;
}
|
4.8. 清除所有元素
如果直接让 size = 0,已经明确了外部获取不到任何值。但让数组内的元素置为 null 可以更好的让 GC 进行回收
1
2
3
4
5
6
7
8
9
10
11
|
@Override
public void clear() {
for (int i = 0; i < size; i++) {
element[i] = null;
}
size = 0;
}
|
4.9. 添加元素
4.9.1. 添加元素到指定位置
需求:我们需要将新元素添加数组中 index=2 的位置。
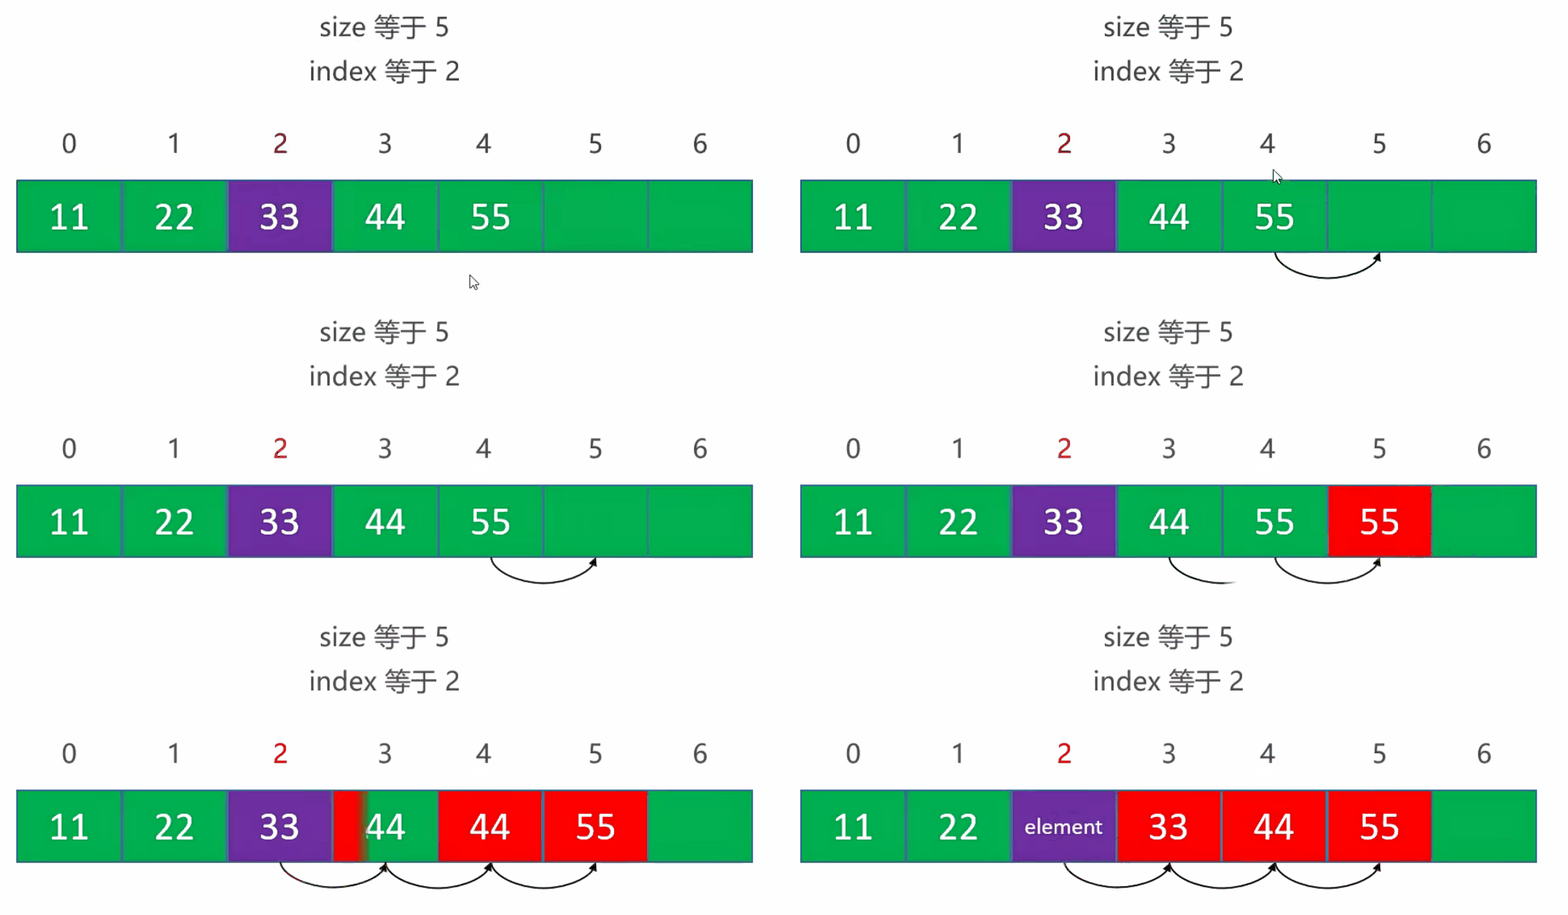
实现步骤
- index:指的是元素下标。
- size:指的是当前数组中存在元素个数。
| 步骤 |
index |
size |
操作 |
代码 |
| Step-1 |
4 |
5 |
将倒数第一位元素向后移动一位 |
elements[index + 1] = elements[index] |
| Step-2 |
3 |
5 |
将倒数第二位元素向后移动一位 |
elements[index + 1] = elements[index] |
| Step-3 |
2 |
5 |
将倒数第三位元素向后移动一位 |
elements[index + 1] = elements[index] |
具体代码
1
2
3
4
5
6
7
8
9
10
11
12
13
14
15
16
17
|
@Override
public void add(int index, E element) {
if (index > size || index < 0) {
throw new IndexOutOfBoundsException("Index: " + index + ", Size: " + size);
}
for (int i = size - 1; i >= index; i--) {
elements[i + 1] = elements[i];
}
elements[index] = element;
size++;
}
|
4.9.2. 添加元素到首尾部
需求:我们需要将新的元素添加数组到首尾部。
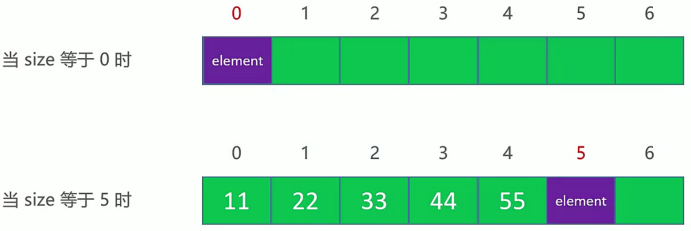
实现步骤
- Step-1:当
size = 0 ,我们需要在 index = 0 的位置插入元素,需要将 elements[size] = element,然后 size++。
- Step-2:当
size = 5 ,我们需要在 index = 5 的位置插入元素,需要将 elements[size] = element,然后 size++。
- Step-3:其实本质上 我们还是相当于在操作
add(int index, Object element)
1
2
3
4
5
6
7
8
9
|
@Override
public void add(E element) {
elements[size++] = element;
}
|
4.10. 删除元素
需求:我们需要删除 index = 3 的元素
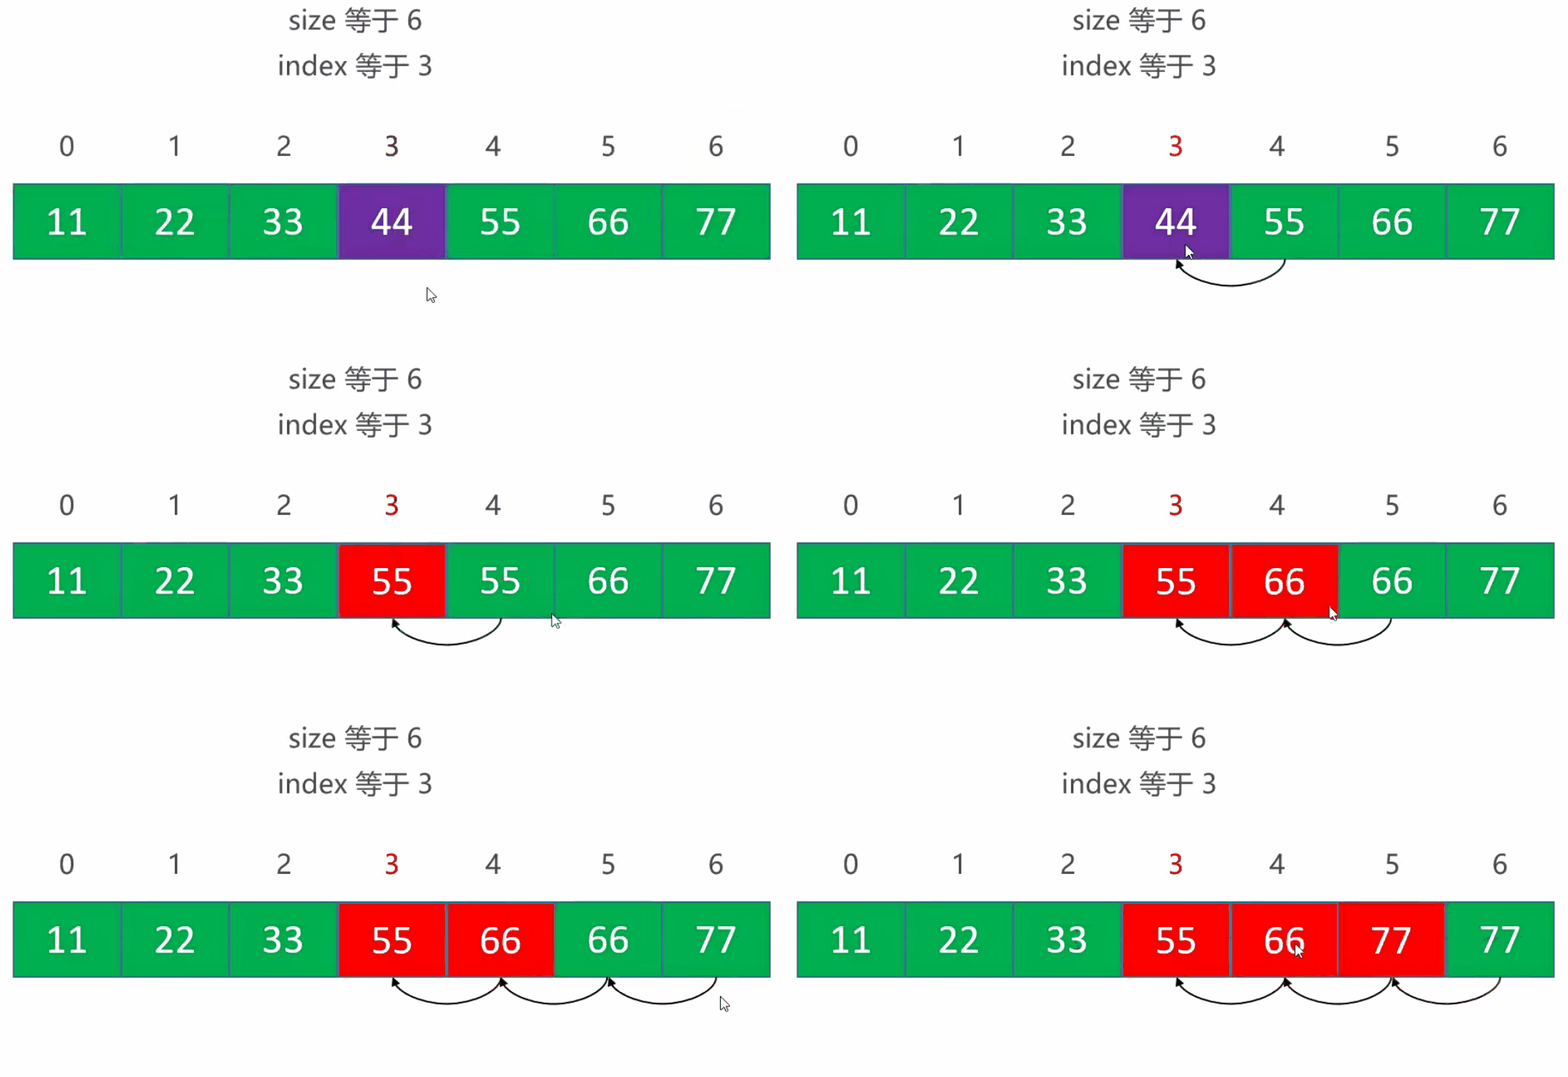
实现步骤
- index:指的是元素下标。
- size:指的是当前数组中存在元素个数。
| 步骤 |
index |
size |
操作 |
代码 |
| Step-1 |
4 |
6 |
将倒数第三位元素向前移动一位 |
elements[index - 1] = elements[index] |
| Step-2 |
5 |
6 |
将倒数第二位元素向前移动一位 |
elements[index - 1] = elements[index] |
| Step-3 |
6 |
6 |
将倒数第一位元素向前移动一位 |
elements[index - 1] = elements[index] |
具体代码
1
2
3
4
5
6
7
8
9
10
11
12
13
14
15
16
17
18
19
|
@Override
public E remove(int index) {
if (index >= size || index < 0) {
throw new IndexOutOfBoundsException("Index: " + index + ", Size: " + size);
}
E oldElement = elements[index];
for (int i = index + 1; i <= size; i++) {
elements[i - 1] = elements[i];
}
elements[--size] = null;
return oldElement;
}
|
4.11. 打印数组
需求:我们需要根据数组的内容打印数组信息
1
2
3
4
5
6
7
8
9
10
11
12
13
14
15
16
| @Override
public String printf() {
StringBuilder builder = new StringBuilder();
builder.append("ArrayList{ size = ")
.append(size)
.append(" , elements = [ ");
for (int i = 0; i < size; i++) {
builder.append(elements[i]);
if (i != (size - 1)) {
builder.append(" , ");
}
}
builder.append(" ] }");
return builder.toString();
}
}
|
4.12. 数组扩容
需求:由于我们默认的数组容量大小是 10 ,如果超过了 10 就需要进行扩容。
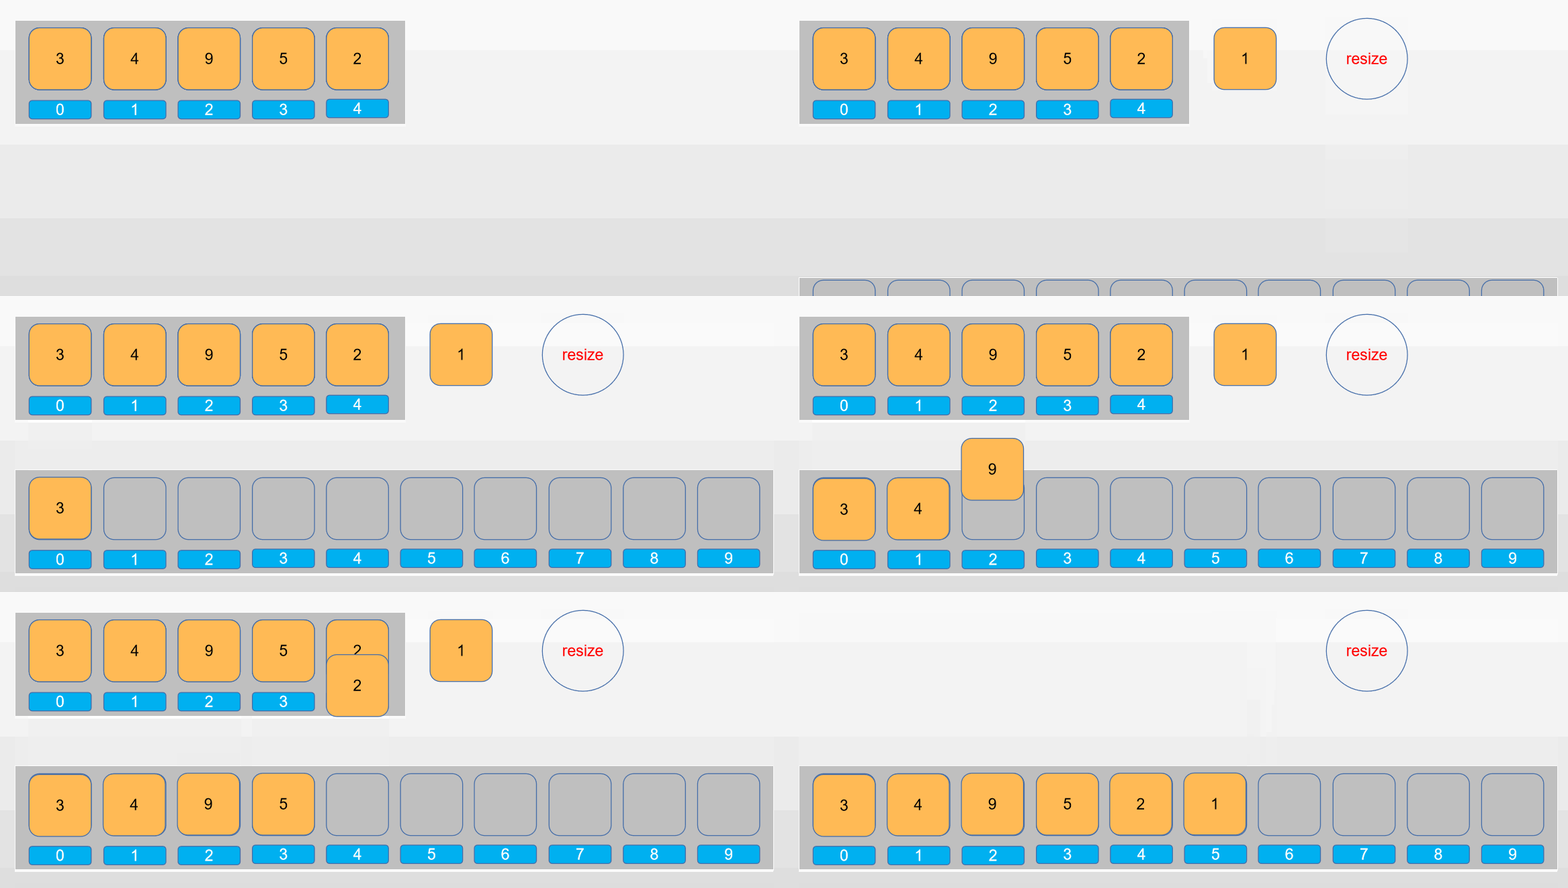
实现步骤
- Step-1:首先,新增元素时,我们判断当前容量是否需要扩容。
- Step-2:然后,根据当前容量大小,重新申请一块新的内存空间用来存放数组。
- Step-3:然后,将原来的数组元素拷贝到新数组中。
- Step-4:最后,再将老数组的地址指向新的数组。
具体代码
1
2
3
4
5
6
7
8
9
10
11
12
13
14
15
16
17
18
19
20
21
22
23
24
25
26
27
28
29
30
31
32
33
34
35
|
@Override
public void add(int index, E element) {
if (index > size || index < 0) {
throw new IndexOutOfBoundsException("Index: " + index + ", Size: " + size);
}
ensureCapacity(size + 1);
for (int i = size - 1; i >= index; i--) {
elements[i + 1] = elements[i];
}
elements[index] = element;
size++;
}
@SuppressWarnings("unchecked")
private void ensureCapacity(int capacity) {
if (capacity - elements.length > 0) {
int newCapacity = capacity + (capacity >> 1);
E[] newElement = (E[]) new Object[newCapacity];
for (int i = 0; i < size; i++) {
newElement[i] = elements[i];
}
elements = newElement;
}
}
|
5. 单元测试
1
2
3
4
5
6
7
8
9
10
11
12
13
14
15
16
17
18
19
20
21
22
23
24
25
26
27
28
29
30
31
32
33
34
35
36
37
38
39
40
41
42
43
44
45
46
47
48
49
50
51
52
53
54
55
56
57
58
59
60
61
62
63
64
65
66
67
68
69
70
71
72
73
74
75
76
77
78
79
80
81
82
83
84
85
86
87
88
| public class ArrayListTest {
private ArrayList<Integer> arrayList;
@BeforeEach
public void setUp() {
arrayList = new ArrayList<>();
}
@Test
public void testInitialCapacity() {
assertEquals(0, arrayList.size());
assertTrue(arrayList.isEmpty());
}
@Test
public void testAddAndSize() {
arrayList.add(5);
arrayList.add(10);
arrayList.add(15);
assertEquals(3, arrayList.size());
assertFalse(arrayList.isEmpty());
}
@Test
public void testGet() {
arrayList.add(7);
arrayList.add(14);
assertEquals(7, arrayList.get(0));
assertEquals(14, arrayList.get(1));
assertThrows(IndexOutOfBoundsException.class, () -> arrayList.get(2));
}
@Test
public void testSet() {
arrayList.add(20);
arrayList.add(30);
assertEquals(20, arrayList.set(0, 25));
assertEquals(25, arrayList.get(0));
assertThrows(IndexOutOfBoundsException.class, () -> arrayList.set(2, 40));
}
@Test
public void testAddAtIndex() {
arrayList.add(100);
arrayList.add(200);
arrayList.add(1, 150);
assertEquals(3, arrayList.size());
assertEquals(150, arrayList.get(1));
assertThrows(IndexOutOfBoundsException.class, () -> arrayList.add(5, 500));
}
@Test
public void testRemove() {
arrayList.add(1);
arrayList.add(2);
arrayList.add(3);
assertEquals(2, arrayList.remove(1));
assertEquals(2, arrayList.size());
assertEquals(3, arrayList.get(1));
assertThrows(IndexOutOfBoundsException.class, () -> arrayList.remove(5));
}
@Test
public void testIndexOf() {
arrayList.add(11);
arrayList.add(22);
arrayList.add(33);
assertEquals(1, arrayList.indexOf(22));
assertEquals(-1, arrayList.indexOf(44));
}
@Test
public void testClear() {
arrayList.add(8);
arrayList.add(16);
assertFalse(arrayList.isEmpty());
arrayList.clear();
assertTrue(arrayList.isEmpty());
}
}
|
6. 总结
总体来说,动态数组这个数据结构不算过于复杂。但在 新增元素、删除元素、动态扩容 这几个部分还是需要主要一下的。

7. 参考博文


