Nginx-动静分离(五)
1. 前言
本文的核心主要是将前四篇博文的内容进行一个综合练习,通过
Nginx部署开源框架Ruoyi-Vue这个需求进行实现动静分离。准备工作
- 网盘链接: https://pan.baidu.com/s/13bTaoFbooNpEQ9oE9vXsGw 密码: vx7n
2. 问题思考?
为什么不使用 Apache Tomcat 处理动静分离?
Apache Tocmat严格来说是一款java EE服务器,主要是用来处理servlet请求。例如SpringBoot中内置的就是 Tomcat 服务器。
静态资源(
html、css、js、图片)交给谁处理?- 将静态文件交给
Nginx处理,可以提高系统的访问速度,减少Tomcat的请求次数,有效的给后端服务器降压。
- 将静态文件交给
静态资源一定是和
Nginx放在同一台服务器的吗?- 是的,本质上来说
Nginx配置本身就是一个静态资源的服务器。例如,我们打的前端 Docker 镜像本质上一个Nginx服务器。
- 是的,本质上来说
那动静分离之后,静态资源如何跟动态请求交互呢?
- 静态资源是通过浏览器和动态资源进行交互的。
3. 具体需求
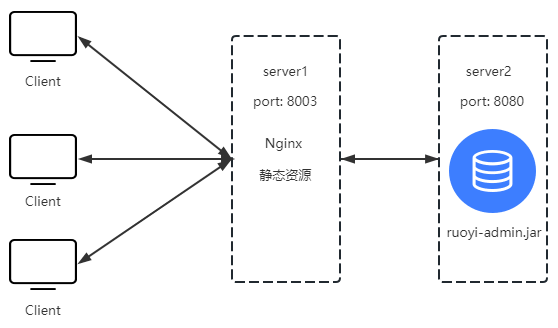
本过程也可以在一台服务器中进行,但为了更好的理解动静分离,本人用到的是两台服务器
server1和server2。
server1:部署的是nginx和 前端文件服务;server2:部署的是后端 jar 服务;实现流程如下:
- 首先,当客户端通过 http://ip:port/path 进行访问。
- 然后,当请求达到服务器之后,通过
Nginx代理 转发到真正的目标服务器上。- 最后,返回请求信息。
- 具体流程如下图
4. Nginx 配置 Ruoyi-Vue 框架
具体步骤如下:
server1:上传静态资源。server1:创建nginx配置文件,并使其生效。server2:修改ruoyi-admin.jar中的数据库和Redis连接信息,并使其生效。server1:通过crul命令是否可以访问该端口。- 客户端访问
4.1. 实现步骤
server1:上传静态资源。文件路径:
/home/ruoyi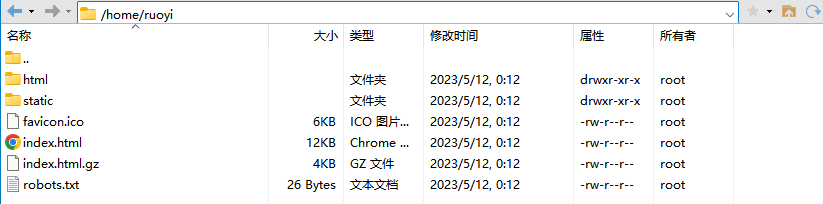
server1:创建nginx配置文件,并使其生效。nginx配置文件路径/etc/nginx/cond.d1
2
3
4
5
6
7
8
9
10
11
12
13
14
15
16
17
18
19
20
21
22
23
24
25
26
27
28
29
30
31
32
33
34# 虚拟主机server块
server {
# 监听端口
listen 8003;
# 匹配请求中的host值
server_name localhost;
charset utf-8;
# 监听请求静态资源路径
location / {
root /home/ruoyi;
try_files $uri $uri/ /index.html;
index index.html index.htm;
}
# 监听请求静态资源路径
location /prod-api/ {
#nginx的主机地址
proxy_set_header Host $http_host;
#用户端真实的IP,即客户端IP
proxy_set_header X-Real-IP $remote_addr;
proxy_set_header REMOTE-HOST $remote_addr;
proxy_set_header X-Forwarded-For $proxy_add_x_forwarded_for;
# 配置代理服务器, 这里 如果是本机就直接使用 http://localhost:port,如果不是就是用目标服务器的 ip + 端口。
proxy_pass http://localhost:8080/;
}
error_page 500 502 503 504 /50x.html;
location = /50x.html {
root html;
}
}
刷新
nginx配置文件1
2
3
4
5[root@VM-0-9-centos conf.d]# /usr/sbin/nginx -t
nginx: the configuration file /etc/nginx/nginx.conf syntax is ok
nginx: configuration file /etc/nginx/nginx.conf test is successful
[root@VM-0-9-centos conf.d]# /usr/sbin/nginx -s reload
[root@VM-0-9-centos conf.d]#
server1:开放防火墙端口,刷新配置。如果为 阿里云 或者 腾讯云 需要配置安全组规则。例如:阿里云-配置安全组规则
1
2
3
4
5
[root@VM-0-9-centos images]# firewall-cmd --zone=public --add-port=8003/tcp --permanent # 开放8003端口
success
[root@VM-0-9-centos images]# firewall-cmd --reload # 刷新防火墙配置
success
[root@VM-0-9-centos images]#
server2:修改ruoyi-admin.jar中的连接信息,并使其生效。通过压缩工具打开
jar包,可以通过360压缩或者7z打开
修改
BOOT-INF\classes文件下application-druid.yml文件中的 数据库连接信息关于Linux下的MySQL安装可以参考我的博客 《Linux-Shell-MySQL》
1
2
3
4
5
6
7
8
9
10
11
12# 数据源配置
spring:
datasource:
type: com.alibaba.druid.pool.DruidDataSource
driverClassName: com.mysql.cj.jdbc.Driver
druid:
# 主库数据源
master:
url: jdbc:mysql://server:3306/ry?useUnicode=true&characterEncoding=utf8&zeroDateTimeBehavior=convertToNull&useSSL=true&serverTimezone=GMT%2B8
username: root
password: P@ssw0rd
......修改
BOOT-INF\classes文件下application.yml文件中的Redis连接信息1
2
3
4
5
6
7
8
9
10
11
12
13
14
15
16
17
18
19
20
21
22# redis 配置
redis:
# 地址
host: server
# 端口,默认为6379
port: 6379
# 数据库索引
database: 0
# 密码
password:
# 连接超时时间
timeout: 10s
lettuce:
pool:
# 连接池中的最小空闲连接
min-idle: 0
# 连接池中的最大空闲连接
max-idle: 8
# 连接池的最大数据库连接数
max-active: 8
# #连接池最大阻塞等待时间(使用负值表示没有限制)
max-wait: -1ms
创建
ry数据库1
2# 创建 ruoyi 数据库 jdbc:mysql://server:3306/ry
CREATE DATABASE `ry` CHARACTER SET 'utf8mb4' COLLATE 'utf8mb4_unicode_ci';将百度网盘中的
ry_20230223.sql文件导入ry数据库中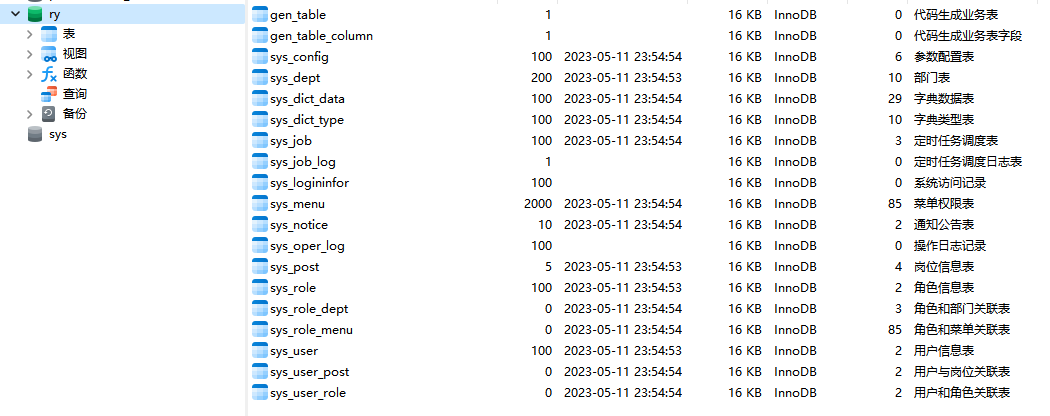
上传至
/home/ruoyi盘符
启动项目
1
2[root@VM-24-4-centos ruoyi]# java -jar ruoyi-admin.jar &
[1] 6556查看日志
1
2
3
4
5
6
7
8
9
10
11
12
13[root@VM-24-4-centos ruoyi]# tail -f nohup.out
..............
00:21:26.908 [main] INFO c.r.RuoYiApplication - [logStarted,61] - Started RuoYiApplication in 28.295 seconds (JVM running for 29.96)
(♥◠‿◠)ノ゙ 若依启动成功 ლ(´ڡ`ლ)゙
.-------. ____ __
| _ _ \ \ \ / /
| ( ' ) | \ _. / '
|(_ o _) / _( )_ .'
| (_,_).' __ ___(_ o _)'
| |\ \ | || |(_,_)'
| | \ `' /| `-' /
| | \ / \ /
''-' `'-' `-..-'
如果为 阿里云 或者 腾讯云 需要配置安全组规则。例如:阿里云-配置安全组规则
1
2
3
4
5[root@VM-24-4-centos ruoyi]# firewall-cmd --zone=public --add-port=8080/tcp --permanent # 开放8080端口
success
[root@VM-24-4-centos ruoyi]# firewall-cmd --reload # 刷新防火墙配置
success
[root@VM-24-4-centos ruoyi]#
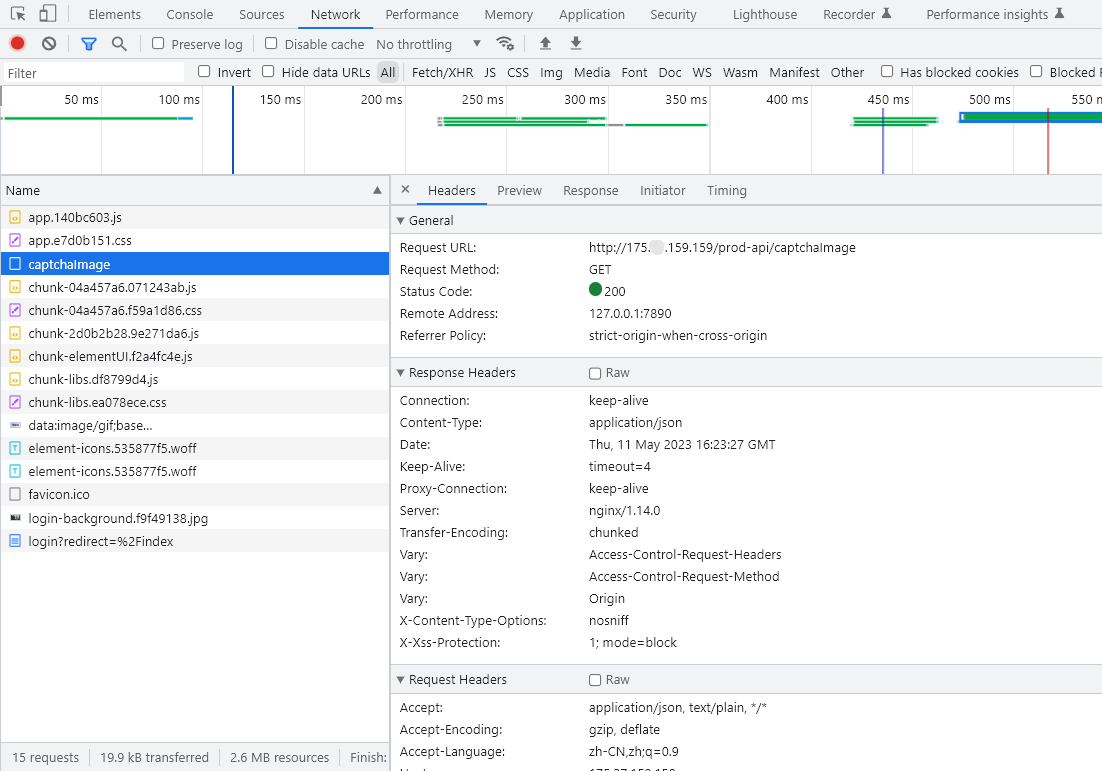
server1:通过crul命令是否可以访问该端口1
2[root@VM-0-9-centos home]# curl http://server2:8080/
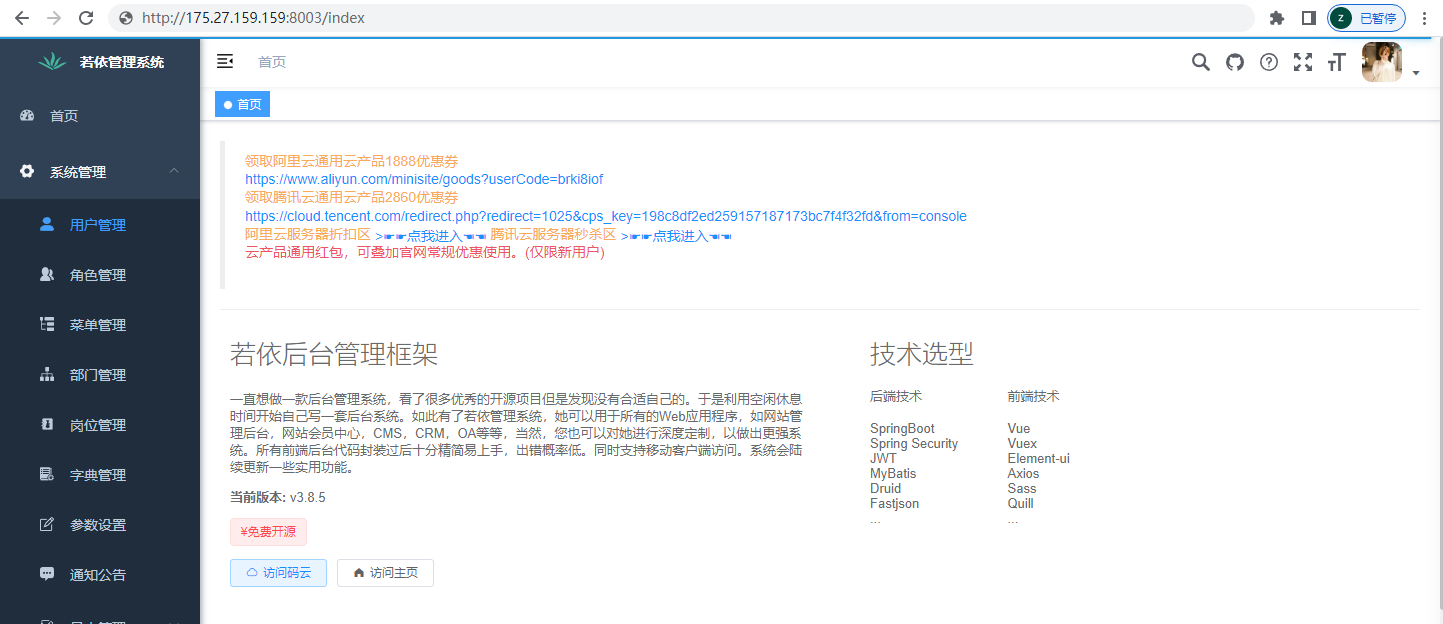
欢迎使用RuoYi后台管理框架,当前版本:v3.8.5,请通过前端地址访问。客户端进行访问
- 访问地址:http://server1:8003
5. 参考博文
 wechat
 alipay