Spring Cloud Bus

本章节的代码:https://github.com/wicksonZhang/Spring-Cloud

我们只需要聚焦在如下服务当中:

1. 基础概念

1.1. Spring Cloud Bus 解决了什么问题?

​ Spring Cloud Bus 主要解决了分布式系统配置的动态刷新问题。例如,服务 serviceA 和服务 serviceB 都有一个名为 application.properties 的配置文件,例如数据库连接信息、日志级别、特性开关等。当这些配置发生变化时,需要通知所有相关的服务实例更新配置,以确保它们使用最新的配置信息。

1.2. Spring Cloud Bus 是什么?

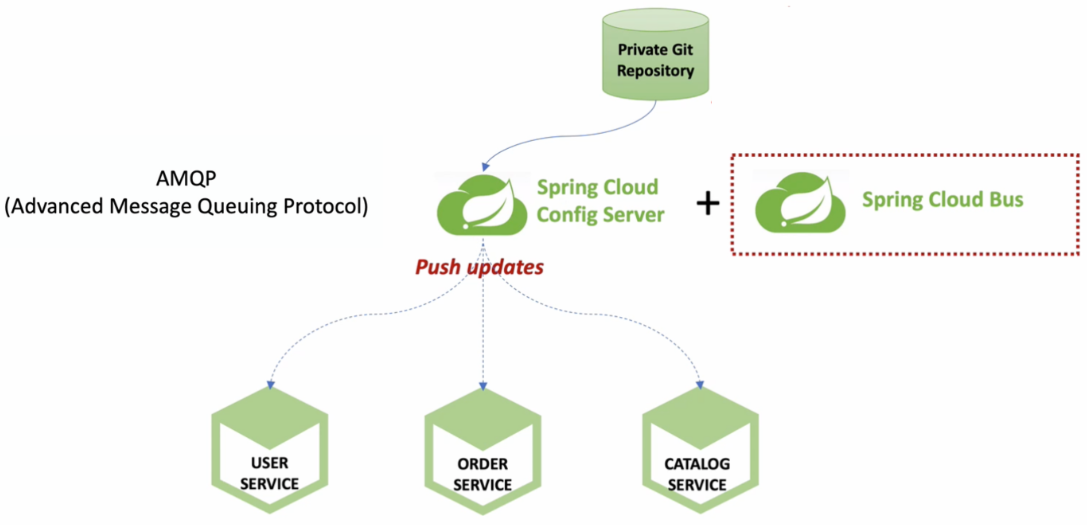
​ Spring Cloud Bus 是 Spring Cloud 中的一个组件,用于实现分布式系统中的消息总线功能,一般与 Spring Cloud Config 结合进行使用。它允许在微服务架构中通过消息代理(消息队列)实现服务之间的通信与协作,主要功能和特性如下:

  • 配置刷新:Spring Cloud Bus 主要用于解决分布式系统中的配置动态刷新问题。当配置中心的配置发生变化是无须重启服务进行刷新,而是通过 Spring Cloud Bus 进行消息广播通知相关的微服务实例。
  • 消息代理:Spring Cloud Bus 使用消息代理(RabbitMQKafka)作为传输工具。

image-20240116105916800

1.3. Spring Cloud Bus 优缺点

优缺点可能就是我们上面所说的一些特性

优点

  1. 配置动态刷新:Spring Cloud Bus 的主要优势是解决了分布式系统中的配置动态刷新问题。它允许在不重启微服务的情况下,通过消息广播的方式将最新的配置信息传递给所有相关的微服务实例。
  2. 事件传播: 除了配置刷新,Spring Cloud Bus 还支持自定义事件的传播。
  3. 消息代理支持: Spring Cloud Bus 使用消息代理(如 RabbitMQ、Kafka 等)作为传输工具,确保消息的可靠性和一致性。

缺点

  1. 引入复杂性: 在小规模和简单的应用中,引入 Spring Cloud Bus 可能会显得过于复杂。
  2. 依赖消息代理: Spring Cloud Bus 的实现依赖消息代理,如 RabbitMQ 或 Kafka。

2. 安装 RabbitMQ

本次由于 Spring Cloud Config 需要只是消息代理作为传输工具,所以需要安装 RabbitMQ.

安装环境:Windows 11、Erlang、rabbitmq-server-3.7.14.exe

安装步骤

1
2
1. Step-1:安装 Erlang
2. Step-2:安装 RabbitMQ

Step-1:安装 Erlang

Step-1:安装 RabbitMQ

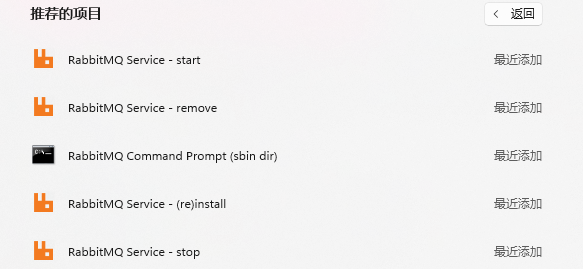
3. 启动 RabbitMQ

操作步骤

1
2
1. Step-1:进入 RabbitMQ 安装目录, 执行启动命令
2. Step-2:访问RabbitMQ

Step-1:进入 RabbitMQ 安装目录,执行启动命令

  • 启动命令:rabbitmq-plugins enable rabbitmq_management
1
2
3
4
5
6
7
8
9
10
11
12
13
14
15
16
D:\software\RabbitMQ Server\rabbitmq_server-3.7.14\sbin>rabbitmq-plugins enable rabbitmq_management
Enabling plugins on node rabbit@DESKTOP-KRH17BU:
rabbitmq_management
The following plugins have been configured:
rabbitmq_management
rabbitmq_management_agent
rabbitmq_web_dispatch
Applying plugin configuration to rabbit@DESKTOP-KRH17BU...
The following plugins have been enabled:
rabbitmq_management
rabbitmq_management_agent
rabbitmq_web_dispatch

started 3 plugins.

D:\software\RabbitMQ Server\rabbitmq_server-3.7.14\sbin>
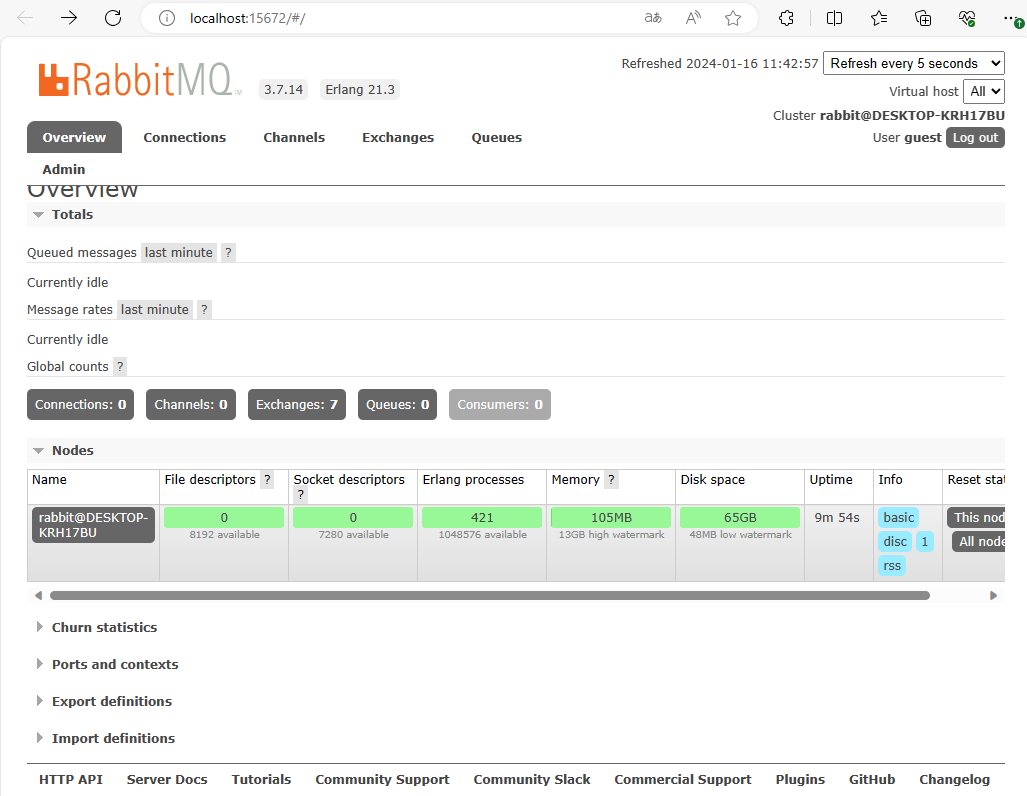
  • 执行完命令之后会出现如下图形化界面

image-20240116114011757

Step-2:访问 RabbitMQ

image-20240116114307458

4. 具体实现

我们是基于上一章节 Spring Cloud Config 的案例进行实现的。

  • 实现需求

    1. 我们基于 Spring Cloud Bus 实现动态刷新配置文件,并通知所有服务。
  • 实现思路

    1. Step-1:我们基于 Spring Cloud Config 案例进行开发。
    2. Step-2:修改配置服务端 10-spring-cloud-config-server-10000
    3. Step-3:修改配置客户端1 10-spring-cloud-config-client1-11000
    4. Step-4:创建配置客户端2 10-spring-cloud-config-client2-12000
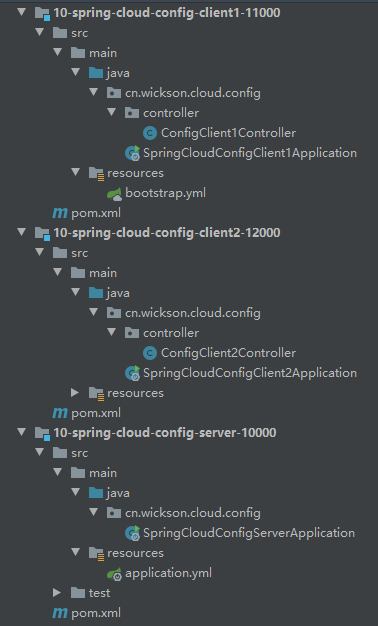
  • 代码结构

    image-20240117114010803

4.1. 修改服务端代码

实现步骤

1
2
1. Step-1: 修改服务端 pom.xml 依赖
2. Step-2: 修改服务端 application.yml 配置

Step-1: 修改服务端 pom.xml 依赖

  • 添加消息总线 RabbitMQ 依赖
1
2
3
4
5
<!-- 添加消息总线 RabbitMQ 依赖 -->
<dependency>
<groupId>org.springframework.cloud</groupId>
<artifactId>spring-cloud-starter-bus-amqp</artifactId>
</dependency>

Step-2: 修改服务端 application.yml 配置

  • 新增 rabbitmq 相关配置
1
2
3
4
5
6
7
8
9
10
11
# 应用名称
spring:
application:
name: spring-cloud-config-server
#------------------------------- 新增 RabbitMQ 相关配置 start -------------------------------
rabbitmq:
host: localhost
port: 5672
username: guest
password: guest
#------------------------------- 新增 RabbitMQ 相关配置 end -------------------------------
  • 新增暴露 bus 刷新配置的端点
1
2
3
4
5
6
7
#-------------------------------- 暴露 bus 刷新配置的端点 start --------------------------------
management:
endpoints:
web:
exposure:
include: 'bus-refresh'
#-------------------------------- 暴露 bus 刷新配置的端点 end --------------------------------

注意,如果报错请参考博文:https://blog.csdn.net/qq_45982171/article/details/128208254

1
2
3
org.eclipse.jgit.api.errors.TransportException: https://github.com/wicksonZhang/Spring-Cloud.git: cannot open git-upload-pack
...
Caused by: org.eclipse.jgit.errors.TransportException: https://github.com/wicksonZhang/Spring-Cloud.git: cannot open git-upload-pack

4.2. 修改配置客户端1

实现步骤

1
2
1. Step-1: 修改服务端 pom.xml 依赖
2. Step-2: 修改服务端 application.yml 配置

Step-1: 修改服务端 pom.xml 依赖

1
2
3
4
5
<!-- 添加消息总线 RabbitMQ 依赖 -->
<dependency>
<groupId>org.springframework.cloud</groupId>
<artifactId>spring-cloud-starter-bus-amqp</artifactId>
</dependency>

Step-2: 修改服务端 application.yml 配置

1
2
3
4
5
6
7
8
9
10
11
12
13
14
15
16
17
18
19
# 应用名称
spring:
application:
name: spring-cloud-config-client
#------------------------------- 新增 RabbitMQ 相关配置 start -------------------------------
rabbitmq:
host: localhost
port: 5672
username: guest
password: guest
#------------------------------- 新增 RabbitMQ 相关配置 end -------------------------------

#--------------------------------- config 客户端配置暴露监控端点 start ---------------------------------
management:
endpoints:
web:
exposure:
include: "*"
#--------------------------------- config 客户端配置暴露监控端点 end ---------------------------------

4.3. 创建配置客户端2

实现步骤

1
2
3
4
5
1. Step-1: 创建项目 10-spring-cloud-config-client2-12000
2. Step-2: 导入 pom.xml 依赖
3. Step-3: 创建 bootstrap.yml 配置文件
4. Step-4: 创建启动类
5. Step-5: 创建控制类

Step-1: 创建项目 10-spring-cloud-config-client2-12000

Step-2: 导入 pom.xml 依赖

1
2
3
4
5
6
7
8
9
10
11
12
13
14
15
16
17
18
19
20
21
22
23
24
25
26
<dependencies>
<!-- 公共依赖 -->
<dependency>
<groupId>cn.wickson.cloud</groupId>
<artifactId>01-spring-cloud-common</artifactId>
<version>1.0-SNAPSHOT</version>
</dependency>

<!-- 添加消息总线 RabbitMQ 依赖 -->
<dependency>
<groupId>org.springframework.cloud</groupId>
<artifactId>spring-cloud-starter-bus-amqp</artifactId>
</dependency>

<!-- Spring Cloud Config 依赖 -->
<dependency>
<groupId>org.springframework.cloud</groupId>
<artifactId>spring-cloud-config-client</artifactId>
</dependency>

<!-- Spring Cloud netflix 服务-->
<dependency>
<groupId>org.springframework.cloud</groupId>
<artifactId>spring-cloud-starter-netflix-eureka-client</artifactId>
</dependency>
</dependencies>

Step-3: 创建 bootstrap.yml 配置文件

1
2
3
4
5
6
7
8
9
10
11
12
13
14
15
16
17
18
19
20
21
22
23
24
25
26
27
28
29
30
31
32
33
34
35
36
37
38
39
40
41
42
43
44
45
46
47
48
49
50
# 服务端口
server:
port: 11000
# 应用名称
spring:
application:
name: spring-cloud-config-client
cloud:
# 配置文件读取地址:http://config10000.com/main/config-dev.yml
# 配置文件读取规则:/main分支/配置文件名称+配置文件后缀.yml
config:
# 分支名称
label: main
# 配置文件名称
name: config
# 读取配置文件后缀
profile: dev
# 配置中心地址
uri: http://localhost:10000
#------------------------------- 新增 RabbitMQ 相关配置 start -------------------------------
rabbitmq:
host: localhost
port: 5672
username: guest
password: guest
#------------------------------- 新增 RabbitMQ 相关配置 end -------------------------------

#--------------------------------- Eureka 配置 start ---------------------------------
eureka:
instance:
hostname: spring-cloud-config-client
# 设置Eureka服务实例的唯一标识为 spring-cloud-config-client2:12000
instance-id: spring-cloud-config-client2:12000
# 设置Eureka客户端是否偏好使用IP地址注册到Eureka服务器,而不是使用主机名
prefer-ip-address: true
client:
service-url:
register-with-eureka: true
fetch-registry: true
# 设置与eureka server交互的地址查询服务和注册服务都需要依赖这个地址
defaultZone: http://eureka3300.com:3300/eureka,http://eureka3400.com:3400/eureka
#--------------------------------- Eureka 配置 end ---------------------------------

#--------------------------------- config 客户端配置暴露监控端点 start ---------------------------------
management:
endpoints:
web:
exposure:
include: "*"
#--------------------------------- config 客户端配置暴露监控端点 end ---------------------------------

Step-4: 创建启动类

1
2
3
4
5
6
7
8
9
@EnableEurekaClient
@SpringBootApplication(scanBasePackages = "cn.wickson.cloud")
public class SpringCloudConfigClient2Application {

public static void main(String[] args) {
SpringApplication.run(SpringCloudConfigClient2Application.class, args);
}

}

Step-5: 创建控制类

1
2
3
4
5
6
7
8
9
10
11
12
13
14
15
16
@Slf4j
@Validated
@RestController
@RefreshScope
@RequestMapping("/config-client2")
public class ConfigClient2Controller {

@Value("${config.info}")
private String configInfo;

@GetMapping("/config-info")
public String getConfigInfo() {
return configInfo;
}

}

5. 广播通知

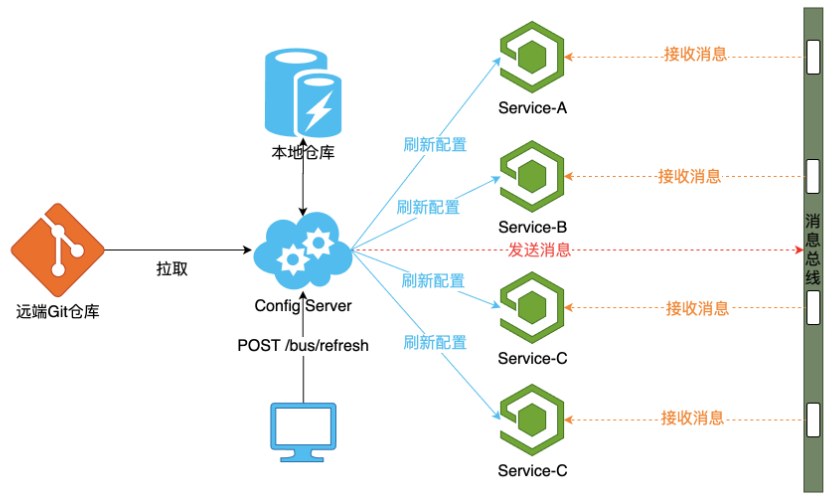
广播通知:配置发生变化之后,只要将配置注册在 Spring Cloud Config 中的服务都会收到通知。

  • 广播通知-通知服务端(推荐方案):主要是利用消息总线触发服务端的 ConfigServer/bus/refresh 端点,从而刷新所有客户端的配置。

    image-20240117104652124

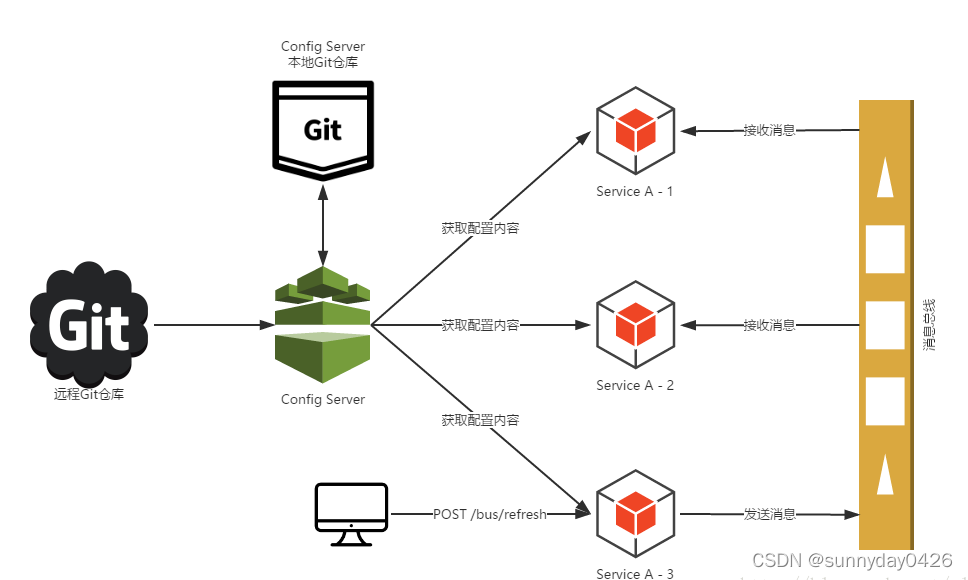
  • 广播通知-通知客户端:主要是利用消息总线触发客户端的 /bus/refresh 端点,从而刷新所有客户端的配置。

    在这里插入图片描述

  • 总结:我们不应该使用通知客户端的方式刷新所有客户端的配置,因为这打破了微服务的单一原则,微服务本身是业务模块,不应该承担刷新客户端的责任。

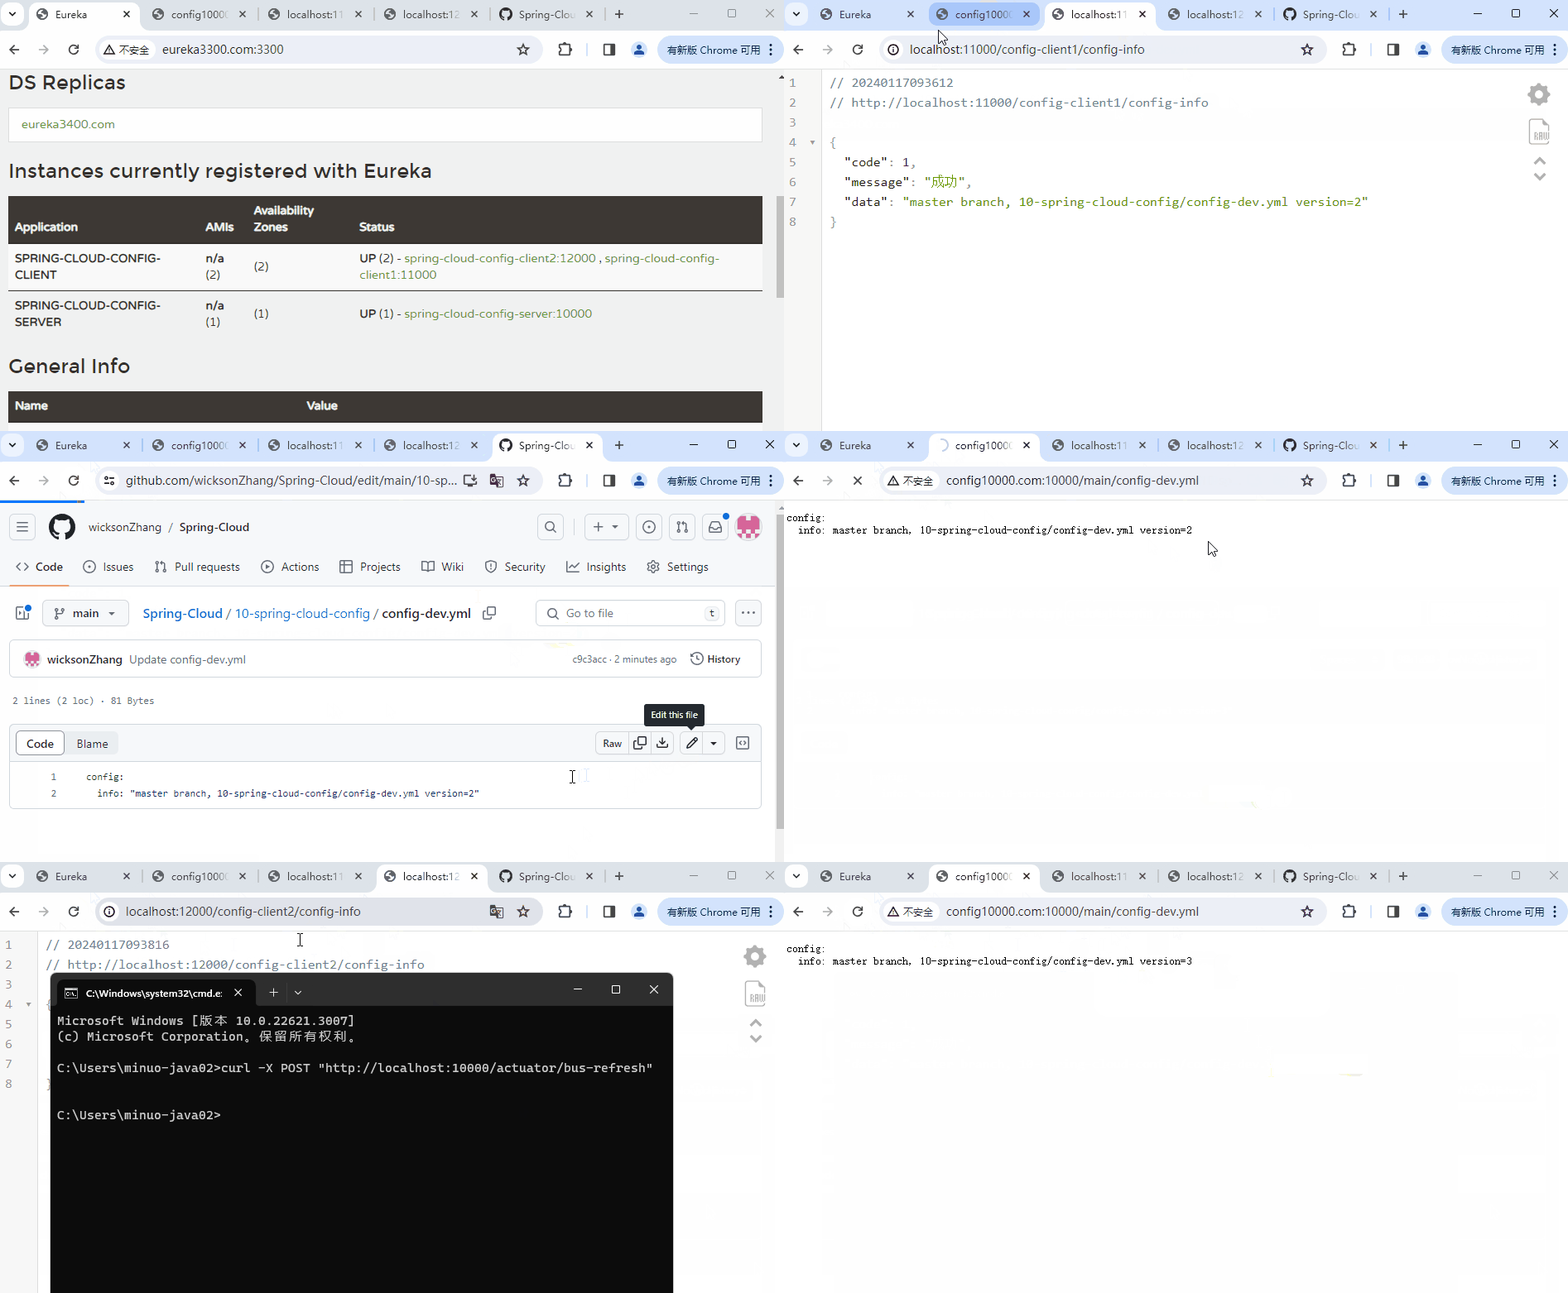
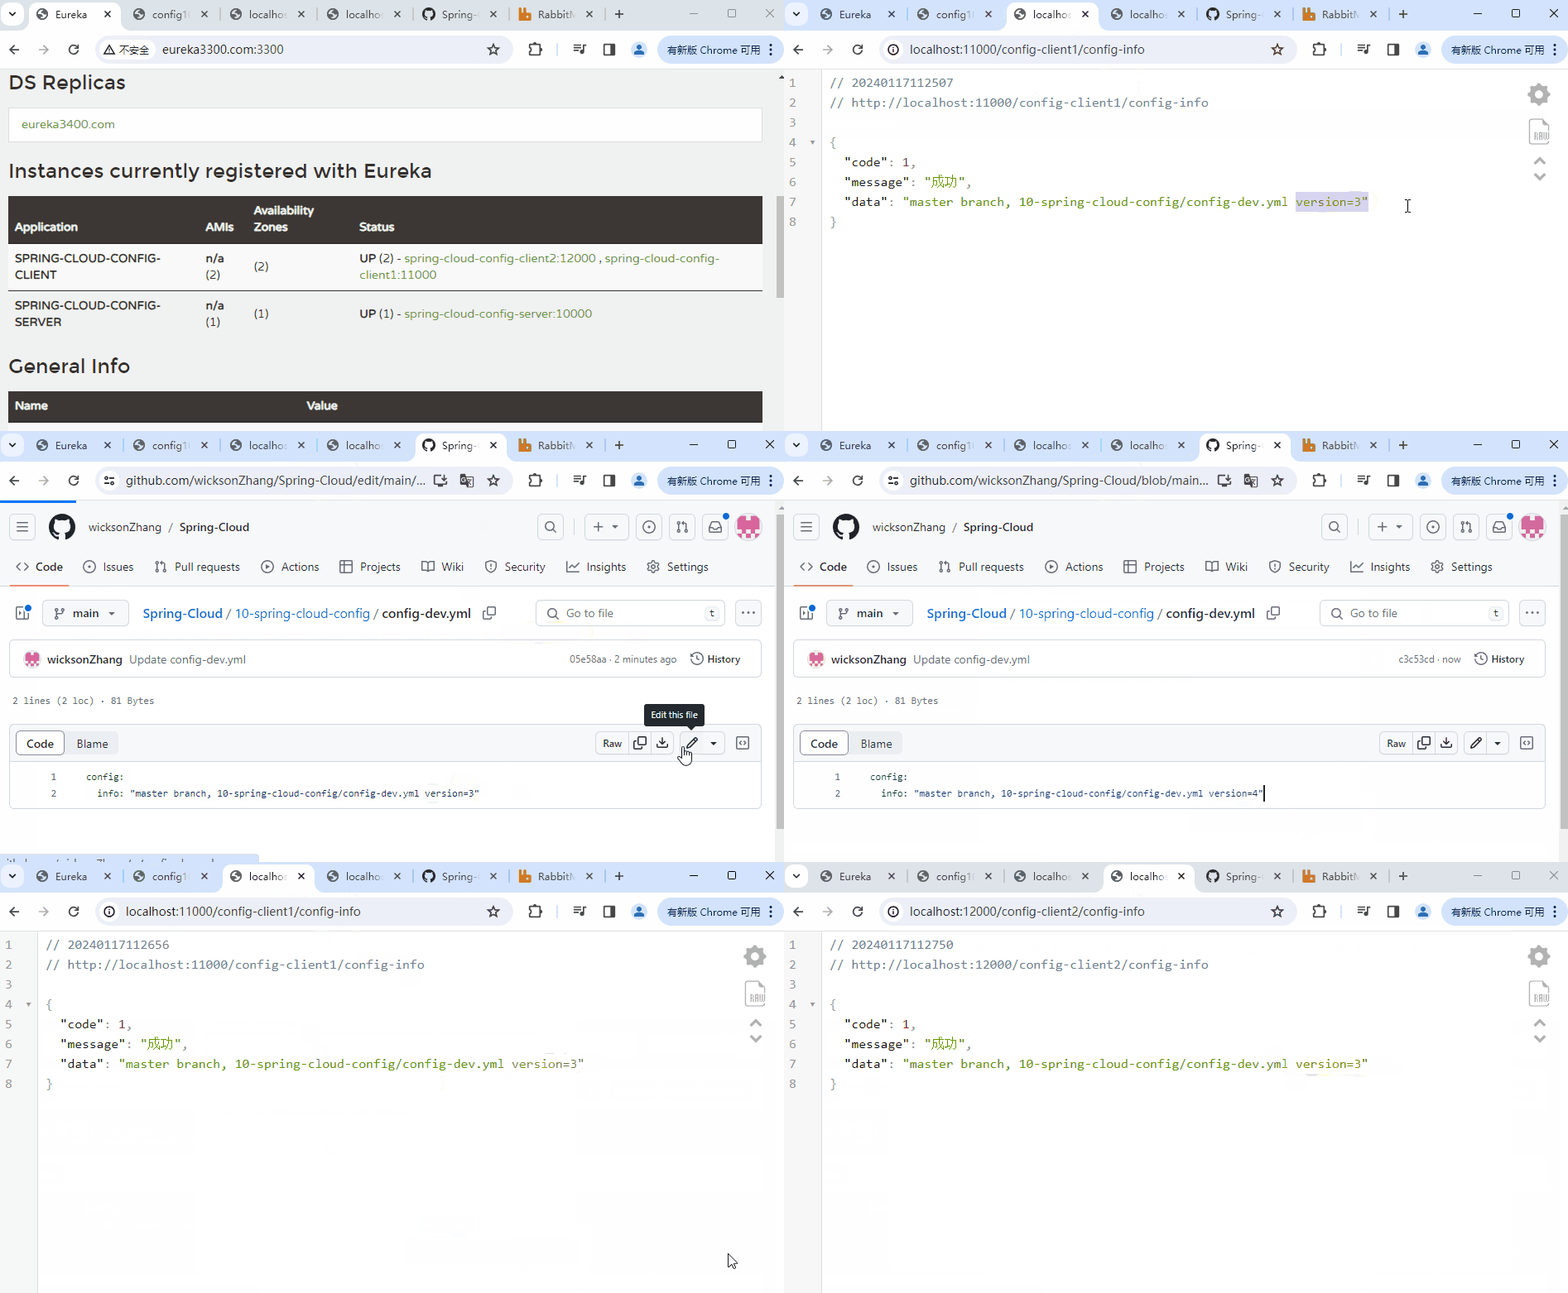
测试步骤如下:

  1. 首先,启动项目:两个 Eureka 注册中心【3300、3400】、配置服务端【10000】、配置客户端1【11000】、配置客户端2【12000】
  2. 其次,查看各个服务中读取到的配置是什么。
  3. 接着,修改 github 仓库中的配置文件,修改配置中的【version】。
  4. 然后,利用消息总线触发服务端的 bus-refresh ,从而刷新整个客户端的配置。
  5. 最后,访问 配置服务端、配置客户端1、配置客户端2 是否读取到修改之后的配置。
1
2
3
C:\Users\wicks>curl -X POST "http://localhost:10000/actuator/bus-refresh"

C:\Users\wicks>

动画

6. 定点通知

定点通知:跟广播通知不同的是,定点通知只会通知具体的服务,都不会进行广播通知。

测试步骤如下:

  1. 首先,启动项目:两个 Eureka 注册中心【3300、3400】、配置服务端【10000】、配置客户端1【11000】、配置客户端2【12000】
  2. 其次,查看各个服务中读取到的配置是什么。
  3. 接着,修改 github 仓库中的配置文件,修改配置中的【version】。
  4. 然后,利用消息总线定点通知指定客户端的 bus-refresh ,从而刷新当前客户端的配置。
  5. 最后,访问 配置服务端、配置客户端1、配置客户端2 是否读取到修改之后的配置。
1
2
3
C:\Users\wicks>curl -X POST "http://localhost:10000/actuator/bus-refresh/spring-cloud-config-client:11000"

C:\Users\wicks>

动画

7. 基本原理

​ 其实我们 ConfigCilent 实例都是监听的 MQ 中同一个 topic(默认是 SpringCloudBus),当一个服务刷新数据的时候,它会把这个信息放入到 Topic 中,这样其他监听的 Topic 服务就会得到更新,然后更新自身的配置。
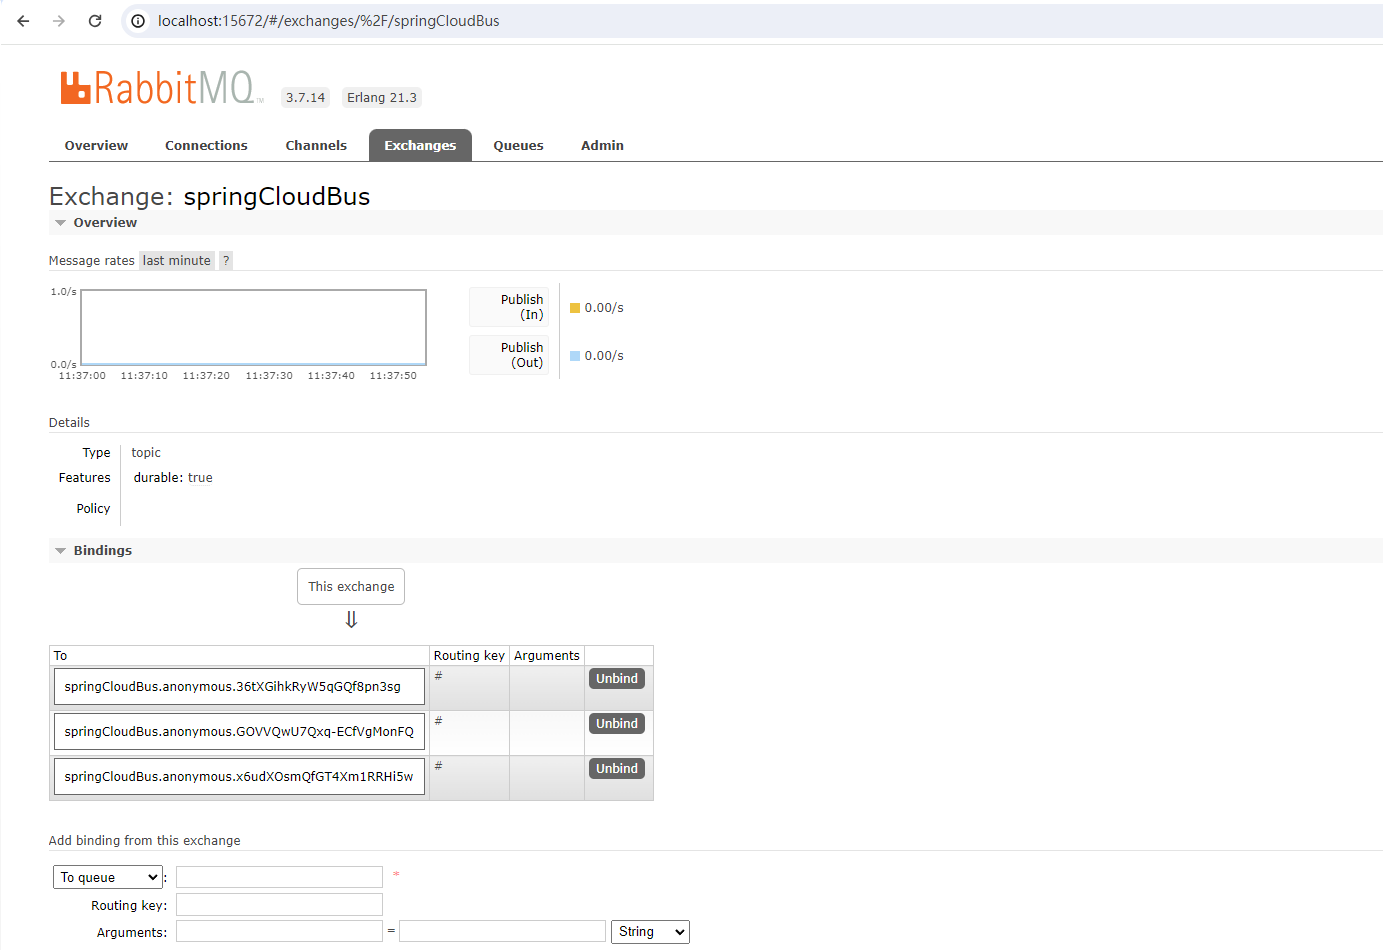
image-20240117113818189