1. 前言
由于上一章节中讲解了《Vue-脚手架》,所以我们想要完全的构建一个项目是需要很多依赖的。
依赖内容如下
2. Vuex
Vuex : 专门为 Vue.js 应用程序开发的状态管理库。
Vuex 主要解决了应用程序中 组件之间共享状态 和 管理状态 的问题。在大型 Vue 应用中,组件的状态可能会变得复杂,而 Vuex 提供了一种集中式管理状态的方式,使得状态的变化和管理更加可预测和可维护。
2.1. 第一步:安装 Vuex
- 由于我们的
Vue 版本采用的是 2.6.14 为了兼容,我们安装 3.5.1 版本的 Vuex
1
| npm instal -g vuex@3.5.1
|
2.2. 第二步:创建 Store
1
2
3
4
5
6
7
8
9
10
11
12
13
14
15
16
17
18
19
20
21
22
23
24
| import Vue from 'vue'
import Vuex from 'vuex'
Vue.use(Vuex)
export default new Vuex.Store({
state: {
},
getter: {
},
mutations: {
},
actions: {
},
modules: {
}
})
|
2.3. 第三步:配置 Store
1
2
3
4
5
6
7
8
9
10
11
| import Vue from 'vue'
import App from './App.vue'
import store from './store'
Vue.config.productionTip = false
new Vue({
render: h => h(App),
store
}).$mount('#app')
|
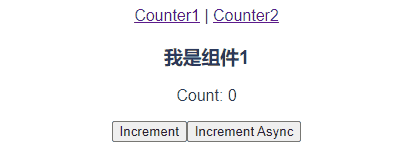
2.4. 案例:计数器
Vuex :计数器应用程序,允许您增加计数并通过异步操作增加计数。
1
2
3
4
5
6
7
8
9
10
11
12
13
14
15
16
17
18
19
20
21
22
23
24
25
26
27
28
29
30
31
32
| import Vue from 'vue'
import Vuex from 'vuex'
Vue.use(Vuex)
export default new Vuex.Store({
// State(状态):应用程序中的所有状态被集中存储在一个状态树中。这个状态树可以看作是单一源 of truth(单一的数据源),供整个应用程序的组件访问。
state: {
+ count: 0
},
// Getter(获取器):Getters允许您从存储在状态树中的状态中派生出一些衍生状态,类似于计算属性。
getter: {
},
// Mutation(变更):Mutations是用于修改状态的方法。它们是同步的操作,用于在应用程序中记录状态变化。
mutations: {
+ increment(state) {
+ state.count++;
+ }
},
// Action(动作): Actions是类似于Mutations的方法,但可以包含异步操作。
actions: {
+ incrementAsync({ commit }) {
+ setTimeout(() => {
+ commit('increment');
+ }, 1000);
+ }
},
// Module(模块): 当应用程序变得复杂时,Vuex允许您将状态和操作分割为模块。
modules: {
}
})
|
- 创建页面
src/views/CounterView1.vue
1
2
3
4
5
6
7
8
9
10
11
12
13
14
15
16
17
18
19
20
21
22
23
24
25
| <template>
<div>
<p>Count: {{ count }}</p>
<button @click="increment">Increment</button>
<button @click="incrementAsync">Increment Async</button>
</div>
</template>
<script>
export default {
computed: {
count() {
return this.$store.state.count;
}
},
methods: {
increment() {
this.$store.commit('increment');
},
incrementAsync() {
this.$store.dispatch('incrementAsync');
}
}
};
</script>
|
- 创建页面
src/views/CounterView2.vue
1
2
3
4
5
6
7
8
9
10
11
12
13
14
15
16
| <template>
<div>
<h3>我是组件2</h3>
<p>Count: {{ count }}</p>
</div>
</template>
<script>
export default {
computed: {
count() {
return this.$store.state.count;
}
}
};
</script>
|
3. Vue-Router
Vue Router :是一个为 Vue.js 应用程序提供路由功能的官方插件。它允许你在单页应用(Single Page Application,SPA)中管理不同视图之间的导航,实现页面之间的切换和状态管理,同时也支持路由参数、嵌套路由、路由导航守卫等功能。
3.1. 第一步:安装 Vue-Router
1
| npm instal vue-router@3.5.1
|
3.2. 第二步:创建 Vue Router
1
2
3
4
5
6
7
8
9
10
11
12
13
14
15
16
17
18
19
20
21
22
23
24
25
26
| import Vue from 'vue'
import VueRouter from 'vue-router'
import HomeView from '../views/HomeView.vue'
Vue.use(VueRouter)
const routes = [
{
path: '/',
name: 'home',
props: route => route.query,
component: HomeView
},
{
path: '/about',
name: 'about',
props: route => route.query,
component: () => import('../views/AboutView.vue')
}
]
const router = new VueRouter({
routes
})
export default router
|
3.3. 第三步:配置 Vue Router
1
2
3
4
5
6
7
8
9
10
11
12
13
| import Vue from 'vue'
import App from './App.vue'
import router from './router'
import store from './store'
Vue.config.productionTip = false
new Vue({
render: h => h(App),
router,
store
}).$mount('#app')
|
3.4. 第四步:使用
1
2
3
4
5
6
7
8
9
10
11
12
13
14
15
16
17
18
19
20
21
| <template>
<div id="app">
<nav>
<!-- <router-link to="/">Home</router-link> |
<router-link to="/about">About</router-link> | -->
<router-link to="/counter1">Counter1</router-link> |
<router-link to="/counter2">Counter2</router-link>
</nav>
<router-view/>
</div>
</template>
<style lang="stylus">
#app
font-family Avenir, Helvetica, Arial, sans-serif
-webkit-font-smoothing antialiased
-moz-osx-font-smoothing grayscale
text-align center
color #2c3e50
margin-top 60px
</style>
|
4. Axios
Axios :是一个基于 Promise 的 JavaScript HTTP 客户端,用于浏览器和 Node.js。它支持在浏览器中发起 HTTP 请求,并且提供了丰富的功能,如请求和响应的拦截、请求取消、并发请求等。
4.1. 第一步:安装 Axios
1
| npm install axios@0.19.1
|
1
2
3
4
5
6
7
| "dependencies": {
"axios": "^0.19.1",
"core-js": "^3.8.3",
"vue": "^2.6.14",
"vue-router": "^3.5.1",
"vuex": "^3.5.1"
}
|
4.2. 案例:获取用户信息
1
2
3
4
5
6
| {
path: '/userList',
name: 'userList',
props: route => route.query,
component: () => import('../views/UserView.vue')
}
|
1
2
3
4
5
6
7
8
9
10
11
12
13
14
15
16
17
18
19
20
21
22
23
24
25
26
27
28
29
30
31
32
33
34
| <template>
<div>
<h1>User List</h1>
<ul>
<li v-for="user in users" :key="user.id">{{ user.name }}</li>
</ul>
</div>
</template>
<script>
import axios from 'axios';
export default {
data() {
return {
users: []
};
},
mounted() {
this.fetchUsers();
},
methods: {
fetchUsers() {
axios.get('https://jsonplaceholder.typicode.com/users')
.then(response => {
this.users = response.data;
})
.catch(error => {
console.error(error);
});
}
}
};
</script>
|

 wechat
 alipay